DVDx Skins
Reference version: DVDx 2.1
You can use different Skins to change the appearance of DVDx interface. The Skins usually share the same functionalities of Original DVDx interface but with a variable look. They differ basically in terms of style, colours, buttons, and icons that coresponds to a Theme. Most people use a custom background picture or colour scheme, and an array of Skins can help you choose the one that best fits. DVDx cames with the Original and the Metal Skin (by dragongodz). You can download others at http://www.labdv.com/dvdx/download.php, or even build up one you would like most.
How to use DVDx skin feature
| Just click on the "File" menu, and "Themes" will show the available skins. DVDx will need to be restarted after selecting the desired one. When you download a new skin, it will be a Compressed Folder (*.zip).
Just decompress (unzip) it on the DVDx Skin Folder (usually at C:\Program Files\DVDx\Skins\). This will create there an INI file (*.ini) and an associated Folder that works for the new skin.
Restart DVDx and check the "Themes" available on the "File" menu, to search for the new one. |
 |
How to create your own Skin for DVDx
| That’s not hard work. You’ll need only a text editor (like Windows Notepad ®) to edit the INI file and a Graphic Editor (like MS Paint ® or Adobe Photoshop ®) to play with bitmaps. Use the Metal Skin, or any other as a template. Create a Copy of it, and rename the INI file and the associated Folder.
Now you should have a look inside the new skin’s Folder. It is composed of a number of bitmap (*.bmp) files. Thumbnail View on Windows Explorer can help you get an idea of theirs look, wich correlates with the skin appearence. They are named accordingly the second and third paragraphs of the associated INI file. See for yourself. |
 |
||
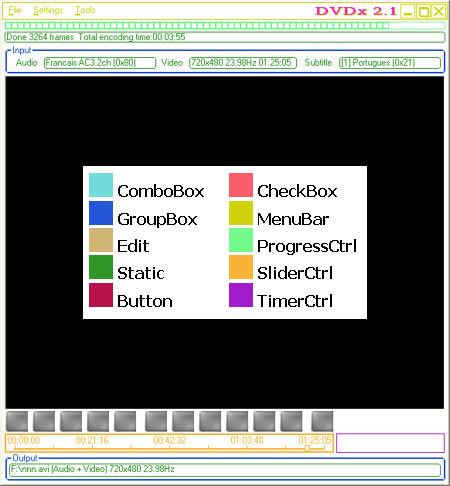
Also, have a look at the INI file: the easier bitmaps to handle are that associated with Coloured Spaces on the interface, they're the first group of nine bitmaps selected from the second paragraph. The next two bitmaps (“numbers” and “numbersalpha”) are associated with time Display. Finally, the bitmaps from the third paragraph are associated with Buttons. To assemble a new appearance to your skin, just change the bitmaps on the folder at your own will, by a different colour, pattern or even a picture, but preserve the associated names whenever possible, so you’ll don’t have to edit the associated INI file entries. The following pictures can help you identify the bitmaps associated with each Coloured Spaces on the interface, thus increasing your perception of possible alterations.
|

|
||
To fine tune your skin, you have the option to edit some Coloured Lines and Text on the DVDx interface. These Lines and Text are setting up on the other INI file entries at subsequent paragraphs. Here, entries like (*_LightColor) and (*_DarkColor) stands for the name of a Coloured Line, and entries like (*_TextLightColor) and (*_TextDarkColor) stands for a Coloured Text. Get familiar with some of them.
|
|||
|
|||
Finally, at INI file entries, “0xBBGGRR” stands for the color itself. When playing with colour codes like this, ignore the first 2 characters but keep them in your skin INI as shown on the Metal Skin. The last 6 characters stands for BBGGRR where BB is blue, GG is green and RR is red. They are in hex format (eg 01,02.....0E,0F). Adobe Photoshop ® Color Picker can give you the colours in RRGGBB format, thus in the following example, you can see a grade of blue that is shown as 324EC3 (at the # box), but DVDx will recognize it as 0xC34E32.
Users of Microsoft Paint ® can also have the RRGGBB code at the Microsoft Color Picker, but in Decimal format. To convert RR, GG, and BB from Decimal to Hexadecimal format, use Windows Calculator ® in Scientific view.
|
|||
That's all.
Have Fun ;-)
Author: Bash (version 1 - February 2, 2003)


 Then
edit the INI file first paragraph to rename the skin accordingly.


 That’s
a good point to test the resulting skin as the Coloured Spaces
claims for the main part of its visible area. To change the Buttons
is a similar task because, although more detailed, they are essencially
bitmaps too. The buttons are 35x60 pixels, where the top/down side
of the image refers to the up and down visualizations of the button.


